Installing and Using Ghdira-MCP on Linux
Originally published on Medium.
Hello cybersecurity enthusiasts, some weeks ago, during a reverse engineering stuff, I heard about ghidra-mcp. Instead of ignoring this tool, my curiosity was triggered, so I decided to take a look and give it a try. The results are pretty mind blowing. As I am a student, I used the student offer to use gh-copilot for free to get my copilot terminal agent connected to my ghidra software. The github repo has changed since I installed it few weeks ago, so I found out how to set it up again.
Sections
- Introduction
- What Ghidra‑MCP Actually Is
- Prerequisites (and Why Versions Matter)
- The Hidden Trap: Ghidra binary
- Installing Ghidra 12.0.3 Properly
- Installing Java 21 (The Step Everyone Misses)
- Cloning and Building Ghidra‑MCP
- Enabling the Extension in Ghidra
- Running the MCP Server + Python Bridge
- Set up Copilot as a terminal MCP agent
- Testing Your First MCP Request
- Troubleshooting (Real Errors I Hit and How I Fixed Them)
- Conclusion
1. Introduction
I am quite an advocate of “doing things on my own” but it is clear that Ghidra‑MCP is one of the most exciting additions to the reverse‑engineering ecosystem right now. It brings Model Context Protocol (MCP) support directly into Ghidra, allowing AI‑powered tools to analyze functions, generate scripts, summarize decompiled code, and automate repetitive tasks, all from inside your RE workflow.
But there’s a catch.
Installing Ghidra‑MCP is not as simple as cloning a repo and running a script. If you’re on Parrot OS, Kali, or any distro that ships Ghidra through APT, you’re almost guaranteed to hit cryptic build errors, version mismatches, or Ghidra refusing to launch with the infamous:
1
Exited with error. Run in foreground (fg) mode for more details.
In this guide, I’ll walk you through the exact steps I followed to get Ghidra‑MCP working, including the mistakes I made, the errors I hit, and how I fixed them. If you follow this tutorial, you’ll avoid waste of time and end up with a clean, working installation.
2. What Ghidra‑MCP Actually Is ?
Ghidra‑MCP is an extension that exposes Ghidra’s internal APIs through the Model Context Protocol (MCP). This allows AI tools (like Claude Desktop, Cursor, or any MCP‑compatible client) to:
- list functions
- extract pseudocode
- rename symbols
- run headless scripts
- query program metadata
- automate analysis tasks (reverse binaries, etc.)
It essentially turns Ghidra into a programmable, AI‑accessible backend.
3. Prerequisites
Before installing, you need:
- Ghidra 12.0.3 (this version specifically)
- A terminal agent (claude, copilot, …)
- Java 21
- Python 3.10+
- Apache Maven 3.9+
- Git
- A Linux/macOS/Windows system
/!\ Important: If you install Ghidra through APT on Parrot/Kali, you will get the binary version, which is incompatible with Ghidra‑MCP.
4. The Hidden Trap: Ghidra binary
This deserves its own section because it’s the #1 reason the project failed in my case.
On Parrot, Kali, and many Linux distributions, running ghidra from the terminal actually launches:
1
/usr/bin/ghidra
This is not the real Ghidra binary. It’s just a wrapper script installed by the package manager, and it points to the system‑wide Ghidra version. You should not use this wrapper script to run ghidra-mcp.
Solution: Use Ghidra 12.0.3 or Ghidra 12.0.4, downloaded manually from the official ZIP release.
5. Installing Ghidra 12.0.3
Download the ZIP from the official NSA GitHub release page.
Extract it:
1
unzip ghidra_12.0.3_PUBLIC_20240410.zip -d ~/Tools/
Verify the folder contains:
1
2
3
4
Ghidra/
support/
docs/
ghidraRun
Do not use /usr/bin/ghidra, that’s just a launcher.
6. Installing Java 21 and system prerequisites
Ghidra 12.0.3 requires Java 21. Most distros ship Java 17 or 11.
Install via apt:
1
sudo apt update && sudo apt install -y openjdk-21-jdk maven python3 python3-pip curl jq
Verify:
1
java --version
7. Cloning and Building Ghidra‑MCP
1
2
git clone https://github.com/bethington/ghidra-mcp
cd ghidra-mcp
Now you can install dependencies and build the project with the following commands.
1
2
3
4
5
6
7
8
9
10
# Check config
python -m tools.setup preflight --ghidra-path ~/ghidra_12.0.3_PUBLIC

# Create virtual .env
python -m venv .venv
source .venv/bin/activate

# Install dependencies
python -m tools.setup ensure-prereqs --ghidra-path ~/ghidra_12.0.3_PUBLIC
python -m tools.setup build
Note that you must respect the typo of the python virtual environment, otherwise it wont run. It is hard coded in tools/setup/python_env.py file:
1
2
3
4
5
6
7
8
9
10
11
12
13
14
15
16
17
18
19
20
21
22
23
from __future__ import annotations

import sys
from pathlib import Path

def detect_repo_root() -> Path:
    return Path(__file__).resolve().parents[2]

def candidate_venv_pythons(repo_root: Path) -> list[Path]:
    return [
        repo_root / ".venv" / "Scripts" / "python.exe",
        repo_root / ".venv" / "bin" / "python",
    ]

def find_repo_python(repo_root: Path, explicit_python: Path | None = None) -> Path:
    if explicit_python is not None:
        return explicit_python.resolve()

    for candidate in candidate_venv_pythons(repo_root):
        if candidate.is_file():
            return candidate

    return Path(sys.executable).resolve()
If everything is correct, Maven will build the extension and deploy it into Ghidra’s Extensions/ directory.
8. Enabling the Extension in Ghidra
Open Ghidra:
1
./ghidraRun
Then:
File → Configure → Utility → Configure -> Check GhidraMCPPlugin is enable
Restart Ghidra.
9. Running the MCP Server + Python Bridge
Inside Ghidra, start the MCP server from the extension menu.
Then run the Python bridge:
1
python3 bridge_mcp_ghidra.py
Your MCP client should now detect Ghidra automatically.
Verify, open a project with a binary file to analyze, go to:
Edit → Tool Options → GhidraMCP HTTP Server → Check if Enable TCP Transport is enable
Next, go to:
Tools → GhidraMCP → Server Status
If server is not running, you can restart it.
10. Set up Copilot as a terminal MCP agent
Once Ghidra‑MCP is installed and the Python bridge is running, the next step is to connect an MCP‑compatible client. In my case, I wanted to use Copilot as a terminal agent, so I could send MCP requests directly from my shell while reversing binaries.
If you haven’t installed the Copilot CLI yet, do it first. You can install it with the following link copilot-cli:
1
curl -fsSL https://gh.io/copilot-install | bash
Verify:
1
copilot --version
Copilot CLI supports MCP agents through a configuration file. To know where the configuration file is, you can directly ask your agent:
1
2
copilot
/mcp show
In my case, with a ParrotOS distribution, the configuration file was located to _/home/
Add the following structure (for Github Copilot):
1
2
3
4
5
6
7
8
{
    "mcpServers": {
        "ghidra": {
            "type": "http",
            "url": "http://localhost:8089"
        }
    }
}
Restart copilot.
What this means:
- type: mcp → tells Copilot this is an MCP agent
- transport: http → Ghidra‑MCP exposes an HTTP server
- endpoint → the address where your Ghidra MCP server listens
If you changed the port in Ghidra, update it here.
Now it should work when you check in your copilot agent (/mcp show) :
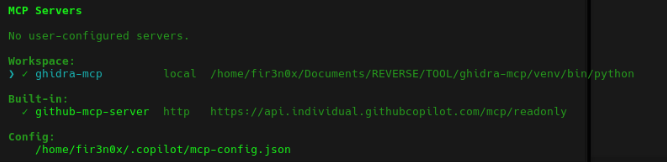
Figure 1 : MCP server configured with Copilot
11. Testing Your First MCP Request
From your MCP client, try:
1
list_functions
You should see a list of functions from the currently opened program. Explain the context of your binary.
You can see a demo below:
12. Troubleshooting
Ghidra exits immediately
Cause: wrong Java version Fix: install Java 21
Compilation error: LoadResults.save(…)
Cause: wrong Ghidra version Fix: use 12.0.3
Extension not visible
Cause: wrong installation path Fix: re-run setup with correct --ghidra-path
Bridge Python not detecting Ghidra
Cause: MCP server not started Fix: start it inside Ghidra
13. Conclusion
Ghidra‑MCP is a powerful addition to any reverse‑engineering workflow, but the installation process can be tricky due to strict version requirements and subtle environment issues. By using the correct Ghidra version, installing Java 21, and following a clean setup process, you can avoid the most common pitfalls and get a fully functional MCP‑enabled Ghidra environment.
If you run into issues or want to share your own setup experience, feel free to leave a comment, I’d love to hear how it went for you.